
Over the last few years, Google has made changes to the way you get to use their SMTP servers to send emails. The last change was made on May 30, 2022.
This blog post shows you how to use PHP to send email from your Gmail account.
NOTE: If you want to take the easy way out, install PHPMailer and skip reading the rest of this blog post. If you want to install and use a mail server, read on.
There are three main steps in this:
- Write the PHP code. Our code will use the
mail()function. - Create an App Password from Google Permissions and Security Settings page.
- Configure and update Postfix
PHP mail() function
If your web runs on PHP and you want to send emails from your Gmail account, you can use PHP's mail() function. You can either send plaintext emails or HTML emails.
This is a sample PHP code for sending email.
<?php
ini_set('display_errors', 1);
error_reporting(E_ALL);

// Required variables
$FROMEMAIL  = '"Nobody" <arulmailer@gmail.com>';
$TOEMAIL    = "youremail@gmail.com";
$SUBJECT    = "A simple hello";
$PLAINTEXT  = "Hello from my PHP script";
$RANDOMHASH = "anyrandomhash";
$FICTIONALSERVER = "@email.myownserver.com";
$ORGANIZATION = "myownserver.com";

// Basic headers
$headers = "From: ".$FROMEMAIL."\n";
$headers .= "Reply-To: ".$FROMEMAIL."\n";
$headers .= "Return-path: ".$FROMEMAIL."\n";
$headers .= "Message-ID: <".$RANDOMHASH.$FICTIONALSERVER.">\n";
$headers .= "X-Mailer: Your Website\n";
$headers .= "Organization: $ORGANIZATION\n";
$headers .= "MIME-Version: 1.0\n";

// Add content type (plain text encoded in quoted printable, in this example)
$headers .= "Content-type: text/plain; charset=iso-8859-1\r\n";

// Convert plain text body to quoted printable
$message = quoted_printable_encode($PLAINTEXT);

// Create a BASE64 encoded subject
$subject = "=?UTF-8?B?".base64_encode($SUBJECT)."?=";

// Send email
mail($TOEMAIL, $subject, $message, $headers, "-f".$FROMEMAIL);
?>
We set the values for sender email, recipient email, subject and email content. That was the first part. This script will not send an email because Gmail SMTP servers have restrictions preventing it.
Less secure app is gone
Previously, Google used to allow you to enable Less secure app access. By enabling it, it would also lower the security of your Gmail account in exchange of allowing you to send email using their servers.
Google removed this on May 30th.
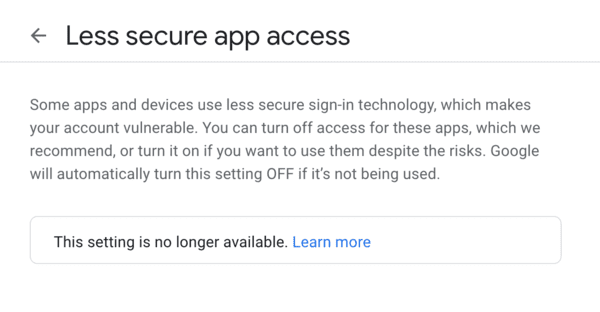
The current and more secure way is using App Passwords.
Create App Password
In order to use the Gmail SMTP servers, we have to open Google Security page page.
Enable 2-Step Verification if you have not already enabled it.
Once you have enabled 2-Step Verification, you will notice a new row called App Passwords.
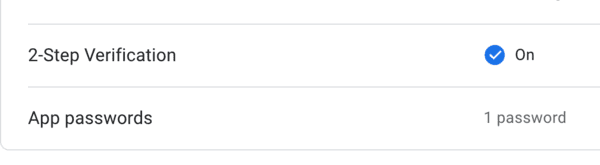
Click on App Passwords and generate a new App Password. You should get something like this. Note it down.
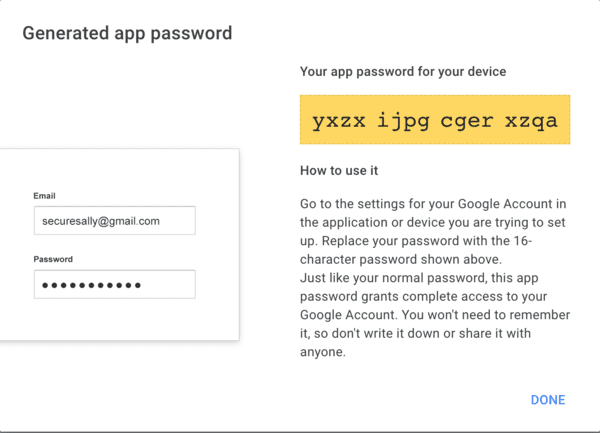
Write it down or copy paste the app password in the yellow box.
Go back to the App Passwords page to make sure it has been created.

Now that the App Password creation has been successful, let us install a mail server. I prefer Postfix because it is easy to set up and very configurable.
Install Postfix mail server
Install Postfix on your server.
If you use Debian or Ubuntu, run this:
sudo apt install postfix
On CentOS or RedHat, run this:
sudo yum install postfix
Configure Postfix to hold App Password
We will store the email and app password in the mail server configuration setting. This is a comparatively higher level of security than the alternative, which is storing the password in your code (which I will not recommend).
Edit /etc/postfix/main.cf and include these lines at the bottom of the file:
smtpd_relay_restrictions = permit_mynetworks permit_sasl_authenticated defer_unauth_destination
myhostname = email.myownserver.com # Change this to your own server name
alias_maps = hash:/etc/aliases
alias_database = hash:/etc/aliases
myorigin = /etc/mailname
mydestination = $myhostname, email.myownserver.com, localhost
relayhost = [smtp.gmail.com]:587
mynetworks = 127.0.0.0/8 [::ffff:127.0.0.0]/104 [::1]/128
mailbox_size_limit = 0
recipient_delimiter = +
inet_interfaces = all
inet_protocols = all

# Enable SASL authentication
smtp_sasl_auth_enable = yes
# Disallow methods that allow anonymous authentication
smtp_sasl_security_options = noanonymous
# Location of sasl_passwd
smtp_sasl_password_maps = hash:/etc/postfix/sasl_passwd
# Enable STARTTLS encryption
smtp_tls_security_level = encrypt
# Location of CA certificates
smtp_tls_CAfile = /etc/ssl/certs/ca-certificates.crt
Storing usernames and passwords in sasl_passwd
The app password will be stored in /etc/postfix/sasl_passwd.
Create a file /etc/postfix/sasl_passwd and add this into it.
[smtp.gmail.com]:587 arulmailer@gmail.com:yxzxijpgcgerxzqa
Remember to put in your own Gmail address and app password instead of copy-pasting the above.
Finally, to make this plaintext file secure, chown it to root:root and change permission to 0600 as root.
sudo chown root:root /etc/postfix/sasl_passwd
sudo chmod 0600 /etc/postfix/sasl_passwd
Create a hash database file for Postfix using postmap. A new file named sasl_passwd.db is created at /etc/postfix/sasl_passwd.db.
sudo postmap /etc/postfix/sasl_passwd
Test Postfix from command line and PHP script
To test if Postfix configuration is correct, try sending a hello email from the command line:
echo "Hello Postfix" | mail -s "Postfix configured" -a "From:arulmailer@gmail.com" youremail@gmail.com
Check whether you have received this email that says "Postfix configured" with body "Hello Postfix".
If successful, then run the PHP script and see if the PHP script has sent the email successfully.
Point to note
Google is strict on how many emails are sent at once and they do have a limit of 500 emails per day. If you are looking at mass emailing customers, then you may want to consider a paid email marketing solution.
For most hobbyists and amateurs, this should be a good solution as of June 2022.
Has this worked for you?
If this tutorial has worked for you, please let me know, and share this post. You can also let me know if you are unable to set it up.
Related Posts
If you have any questions, please contact me at arulbOsutkNiqlzziyties@gNqmaizl.bkcom. You can also post questions in our Facebook group. Thank you.