 Our son's Awana Grand Prix / Pinewood Derby Car
Every year, our children's church hosts the annual Awana Grand Prix Pinewood Derby car races. There are multiple categories used for judging. Usually, our kids focus on design and themes. This year, our 6th grader son George wanted his car to be very fast and win every round. We helped him design his car, which actually ended up winning every single round with an average speed of 182.69 mph and time of 2.7058 seconds.
This blog post is a low budget way of making the fastest Awana Grand Prix / Pinewood Derby car.
- What is the Pinewood Derby / Awana Grand Prix car race?
- Before the competition
- What happens during the competition?
- What is the role of parents in this competition?
- This is a family activity ; Do not buy readymade cars
- What do we need to win?
- Buy the Awana Grand Prix pre-cut car block kit
- Read the rules of your competition
- Tools we used
- Materials we used
- Best car design for speed
- Add weights
- How does the weight distribution work?
- Physics behind a fast Grand Prix car
- Paint the car
- Reducing friction
- Polish and smoothen the axles
- Remove extra plastic from the wheels
- Add the axles and wheels
- Curve one of the front axles, if possible
- Glue the axles to the wood
- Add graphite powder
- Final weighing
- Competition day
- What we could have done better
- Conclusion
What is the Pinewood Derby / Awana Grand Prix car race?
The Pinewood Derby is a miniature wood car racing event for Scouts who are with the BSA. Cub scout packs build their cars from starter kits containing pre-cut pinewood car blocks, plastic wheels and steel axles.
Several churches around the US have Awana programs that include Pinewood Derby and their version is called Awana Grand Prix. Rules may be the same or different from that of the Scouts.
In both the Awana Grand Prix and BSA Pinewood Derby, the dimensions of the cars are usually the same. The length is 7", width of the car is 2 3/4" and width between wheels is 1 3/4". The weight of the car after everything is done should not exceed 5 ounces.
Your job is to modify the car and design it in whichever way you want, as long as the modified car stays within the rules.
Before the competition
Before the competition, each car is weighed. The maximum weight for a car is 5 ounces. If the car goes above 5 ounces, the owner has to reduce weight by removing a few of the added weights.
Once the car is 5 ounces or lower, it is checked in and placed on a table, and nobody will be allowed to touch their cars until the competition begins.
What happens during the competition?
The competition has several rounds and for each round, there are 4 cars racing at a time. Each child will pick their own car and place it on top of the 35 foot long aluminum track. For each round, all 4 cars are released at the same time and timed with an electronic timer when they reach the end line.
Due to gravity, all cars start moving down until they are level with the ground. The more aerodynamic cars move faster when they are on the horizontal part of the track. Sometimes, cars may not reach the end line.
 Pinewood Derby Car track
What is the role of parents in this competition?
Building the car is a great activity between kids and their parents or grandparents. If the child wants their car to look like a certain shape, the parents can use tools and machinery to make the necessary woodwork changes. If you are a parent and your child already knows how to use a saw, chisel or file, please let them use it with supervision.
The child would spend the rest of the time coloring or painting, adding props, and using their creativity to come up with a fun car.
This is a family activity ; Do not buy readymade cars
A few people buy readymade cars on eBay, Craigslist or other websites for anywhere from $100 to $300. Please do not be one of them.
If you are cheating by buying readymade cars, you are losing out a great bonding moment with your kids.
Also, if you do everything yourself, you are robbing your child of expressing their artistic sense and creativity.
In a few competitions, kids have actually asked their fathers, "Dad, which one is my car?"
What do we need to win?
The short answer is an aerodynamic design for the car, basic set of tools and materials, and high school Physics (knowledge of potential energy, kinetic energy and friction).
Buy the Awana Grand Prix pre-cut car block kit
We bought a similar pre-cut car block kit from church. The church had three shapes to pick from. George picked this kit.
 Awana Grand Prix pre-cut car block kits
All kits comes with a pre-cut pinewood block. The first two in the picture above are shaped like cars and the third one has a cuboid shape, and looks like a bus or long truck.
Along with these car blocks are plastic wheels, 4 steel axles and a bunch of stickers. Each kid has to decide a number associated with their car and name their car with a fancy name. George named his Cyanomix.
Read the rules of your competition
The kit includes a rules printed insert. Each competition may have their own rules. Please read all the rules first. This is very applicable, especially if you want to use custom axels or are unsure about what lubricants are allowed or prohibited.
For example, the BSA prohibits wet lubricants such as oil or grease, and only allows dry graphite as a lubricant. There are a few churches that allow coconut oil to be used as lubricants at the axles.
If you want to make new holes to put the axles in, there may be rules regarding distance between the front and rear axles, as well.
The rules may be more flexible for churches' Awana Grand Prix car races. It is best to read the rules to avoid disqualification.
Tools we used
We bought these from Lowes, Home Depot and Harbor Freight.
- Hand saw or Compass saw
- Chisel and Mallet
- File (bastard file) with rough and smooth ends
- Xacto knife
- Sandpaper
If you already have an electric saw or dremel tool, you can use them to make cleaner cuts and smooth out the wood.
 Tools we used to shape the car
Materials we used
We bought paint+primer spray combo bottles from Lowes and the weights and graphite from Hobby Lobby.
- Krylon Fusion Spray Paint+Primer (blue and black)
- Weights (2 packs)
- Graphite
- Superglue
- Flattened carboard box
 Materials we used to shape the car
Best car design for speed
To make your car really fast, the car has to be as aerodynamic as possible. To achieve that, the best shape is a wedge shape. In a wedge shaped car, wind resistance is very low and air flow over the top of the car is maximized. If the surface area of the car is greater in the front, that creates more wind resistance, thereby slowing down the car.
Cut the block into a wedge shape
Using a pencil, draw the lines on the wood where you will make the cuts. When you are satisfied with the sketch, cut out the car block using a regular saw, compass saw or electric saw so that the shape looks tapered from rear to front. I also used a chisel and rubber mallet to chip off the initial larger chunk of the wood.
Try not to make the front of the car pointed yet. Pinewood is very delicate and the wood can chip easily.
After you are done with the initial tapering of the car, use the rough end of a bastard file to shape it well. At the same time, try to get the front of the car as pointed as possible.
Next, use the smooth end of the bastard file to make the surface smooth. You can also use sandpaper to make it smooth.
At this point, your car may weight about 2 or 2.5 ounces.
Add weights
The weight distribution can be a little tricky. You want to maximize the 5 ounce weight. Remember that the car is not painted yet. The paint alone will be at least 0.5 ounce in weight, so aim for 4.5 total weight before the paint job.
First, weigh the car, 4 axles and wheels, and the weights on a weighing scale. Make sure they altogether weight under 4.5 oz.
The best place to fix the weights is towards the lower half of the car.
How does the weight distribution work?
You can create a DIY track with used Amazon boxes, similar to the actual aluminum track.
Attach the wheels with axles and temporarily tape the weights to the top of the car. Slide the car down the DIY track. Note the speed.
Next, move the weights half an inch to the back, repeat the round, and note the time.
You will observe that at some point at the lower half, the car moves the fastest. That would be your golden spot. Remove the axles and wheels.
Screw in the weights to the wooden car at this point.
Physics behind a fast Grand Prix car
When the car is stationary at the top of the track, the car has potential energy. Potential energy is directly proportional to the weight of the car. That is why it is necessary to maximize all 5 ounces towards the end of the car build.
When the car is let go and starts moving down the track due to gravity, potential energy is converted to kinetic energy. This kinetic energy has to be maximized in order for the car to move at its fastest possible velocity once it reaches the horizontal part of the track.
At this point, friction would be the hurdle and the car will travel slower or move shorter distances if there is too much friction. To reduce friction, you have to smooth the axles, remove extra plastic extensions from the wheels and add graphite to the axles.
Potential Energy → Kinetic Energy {with} Minimal Friction
We will do all of these in the following sections.
Paint the car
In the past, the kids hand-painted their cars. This year, we decided to spray paint just to see how different it would be.
Krylon Fusion Spray Paint+Primer was excellent and fast drying (24-hour drying), so we selected it.
Place flattened cardboard boxes on the ground outside, put the car on it and and spray paint it.
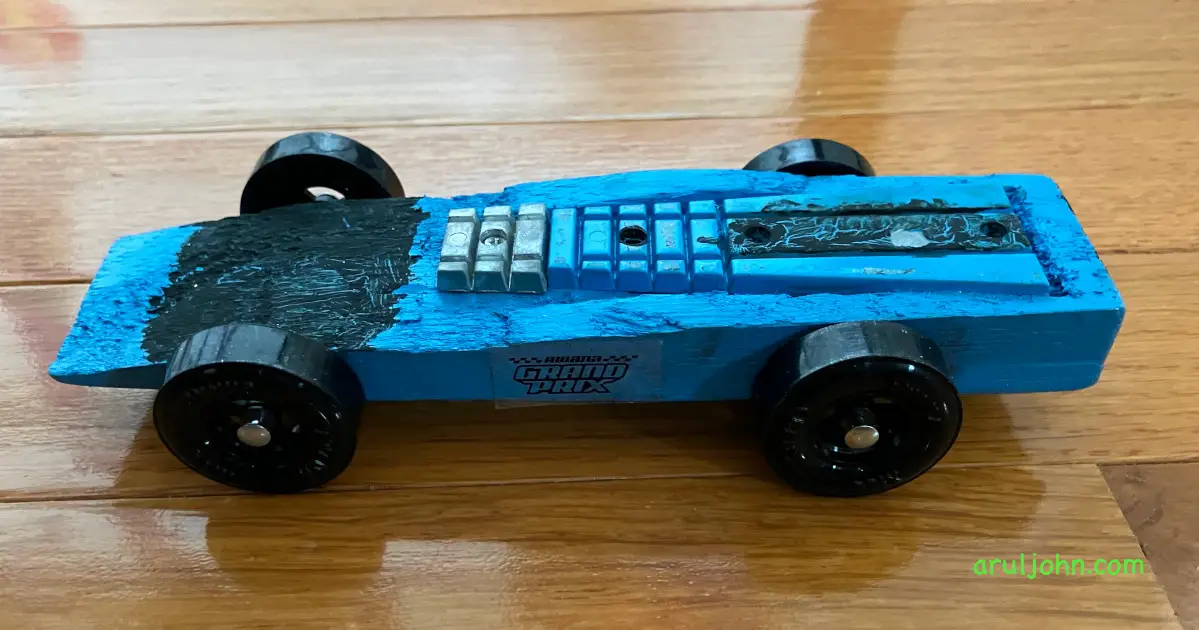
George painted his car blue with black smudges. He later named it CYANAMIX. After a day, he spray painted a new coat. The second coat added to the depth of the blue color, artistically and literally!
Remember that paint adds about 0.5 ounce weight.
Using other paints
Instead of using this particular spray paint, you can buy any spray paint, but you need a primer as well. Most paint jobs may require you to wait for a few days.
If you want to use regular hand paint, you can do that as well. Just give it a few days to dry up.
Reducing friction
To reduce friction in Pinewood Derby cars, remember these points:
- Polish and smoothen the axles. Use sandpaper or a metal file. At the end, the axles have to be as smooth as possible.
- Remove extra plastic from the wheels. You may find plastic extensions that can actually hamper full movement of the wheels.
- Make only 3 wheels touch the ground. The fourth wheel (a front wheel) can have its axle slightly point higher so the car is on 3 wheels.
- Lubricate the axles and wheels with graphite powder. Be generous with the graphite and make sure the axles are coated well.
Polish and smoothen the axles
If the axles have ridges or crimp marks, gently and carefully get rid of them using the smooth part of the file followed by sandpaper. This will help the car reduce friction as it travels down the slope.
Remove extra plastic from the wheels
There may be bumps on the plastic wheel. Using an Xacto knife, carefully remove the extra plastic extensions protruding from your wheels, if any. Ours had a 2 millimeter extension protruding on each of the 4 wheels.
Add the axles and wheels
Next, attach each of the 4 axles and wheels to the pre-drilled holes. Gently nudge them in or tap with a hammer. Do not push the axles too deep inside. The wheels should spin freely.
Curve one of the front axles, if possible
Using pliers, gently curve one front axle upwards so that the wheel does not touch. After this is done, your car will rest on both its rear wheels and one front wheel. This step reduces friction as well.
Glue the axles to the wood
Let the car slide down a few times to make sure that the position of the axles and wheels are good. The wheels should NOT touch the body of the car when turning around. If that happens, pull out the axle by a few millimeters and test again.
When you are happy with this, lay the car on its back and pour a few drops of superglue on the axles so the axles will stick to the wood. Let it stay like that overnight.
Supergluing is best if an adult did it. Also, be very careful not to get superglue on your hands.
Add graphite powder
After 24 hours of resting, weigh the car and see if the weight is under 5 ounces. We will use the extra buffer weight for the graphite powder. The weight should not be great than 5 oz.
Now, open the graphite powder tube and pour a generous amount of graphite powder into the axel and spin the wheel over the graphite. You will find that the wheel will spin much faster, in fact by a factor of 3 or 4 times more revolutions. Add graphite for the remaining wheels and tdst them all.
Final weighing
Weigh the car again. If the weight is 4.9 oz, you are done. If your weighing scale or the Awana Grand Prix weighing scale is not calibrated properly, there may be a slight difference, usually 0.1 or 0.2 oz. It's happened to us every year.
If you see that the weight is 4.5 oz or lesser, feel free to add more weights to the car, towards the back. The weights up in this blog post can be broken into smaller weights, so you can apply the corresponding sized weights.
Competition day
On the competition day, George registered his car as CYANAMIX. It won every single round, sometimes by a wide margin. George's car won first place in the boys' section. CYANAMIX had an average speed of 182.69 mph and average time of 2.7058 seconds.
On basis of average speed throughout, his car ended up in the second place overall.
 George's winning car CYANAMIX: Awana Grand Prix day
What we could have done better
My carpentry skills are lousy. If you know how to use a chisel, file and sandpaper, please smoothen the car better than we did. A rough surface can add to friction.
Maybe spending more time on testing the weights distribution to maximize the potential energy to kinetic energy conversion could have helped.
Conclusion
I kept my promise to my boy and got his car to win every race it was a part of. He is happy and I am happy.
If this is your first time in the Awana Grand Prix or Pinewood Derby car races, all the best!
If this blog post helped your kid's car win, let me know!
If you have any questions, please contact me at arulbOsutkNiqlzziyties@gNqmaizl.bkcom. You can also post questions in our Facebook group. Thank you.